
Queues are useful for taking jobs, pieces of asynchronous work, and sending them to be performed by some other process. This is especially useful when making time-consuming API calls or calculations that you don’t want to make your web users wait for before being served their next webpage.
Another benefit of using queues is that you don’t have to work the queues on the same server as your web application. If your jobs involve intensive computations, you don’t have to risk those jobs taking down or slowing your web application server for your users.
Assume that you have set up a laravel application in your system or run following command in composer
composer create-project --prefer-dist laravel/laravel test-queue-app
set DB with .env file and run
php artisan servecheck http://localhost:8000 in your browser.
Take an example,
php artisan make:model Order -mfOpen and Edit ..create_orders_table.php migration file as below,
Schema::create('orders', function (Blueprint $table) {
$table->increments('id');
$table->string('name', 100);
$table->integer('item_count')->unsigned();
$table->timestamps();
});
run following command.
php artisan migrateOpen and Edit OrderFactory.php file as below,
<?php
use Faker\Generator as Faker;
$factory->define(App\Order::class, function (Faker $faker) {
return [
'name' => $faker->name,
'item_count' => rand(1,10),
];
});
Now let’s edit DatabaseSeeder.php and seed some data to work with order table.
<?php

use Illuminate\Database\Seeder;

class DatabaseSeeder extends Seeder
{
/**
* Run the database seeds.
*
* @return void
*/
public function run()
{
factory(App\Order::class, 50)->create();
}
}
run following command
php artisan db:seedNow we have been seeded data in orders table.
MAIL SETUP
For local development purposes, we will use mailtrap for mail implementations.
set of mailtrap account and update credentials in env file.
Let’s create a Mailable:
php artisan make:mail OrderShipped --markdown=emails.orders.shippedEdit OrderShipped.php file as below,
<?php

namespace App\Mail;

use Illuminate\Bus\Queueable;
use Illuminate\Mail\Mailable;
use Illuminate\Queue\SerializesModels;
use Illuminate\Contracts\Queue\ShouldQueue;

use App\Order;

class OrderShipped extends Mailable
{
use Queueable, SerializesModels;

public $order;

/**
* Create a new message instance.
*
* @return void
*/
public function __construct(Order $order)
{
$this->order = $order;
}

/**
* Build the message.
*
* @return $this
*/
public function build()
{
return $this->markdown('emails.orders.shipped');
}
}
edit emails/orders/shipped.blade.php markdown file,
@component('mail::message')
# Introduction

Thank you {{ $order->name }}. We just shipped {{ $order->item_count }} items.

@component('mail::button', ['url' => ''])
Track Order #{{ $order->id }}
@endcomponent

Thanks,
{{ config('app.name') }}
@endcomponent
create new controller like below
php artisan make:controller MailControlleredit web.php routes file,
Route::get('mail', 'MailController@index');Edit MailController.php as below,
<?php

namespace App\Http\Controllers;

use Illuminate\Http\Request;

use Illuminate\Support\Facades\Mail;
use App\Mail\OrderShipped;
use App\Order;

class MailController extends Controller
{
public function index() {

$order = Order::findOrFail( rand(1,50) );

$recipient = 'user1@web.com';

Mail::to($recipient)->send(new OrderShipped($order));

return 'Sent order ' . $order->id . 'items.';
}
}
Navigate to http://localhost.8000/mail in your browser, you will see output in browser like below..
Sent order XX items.
Take a look in mailtrap and you should see your message.
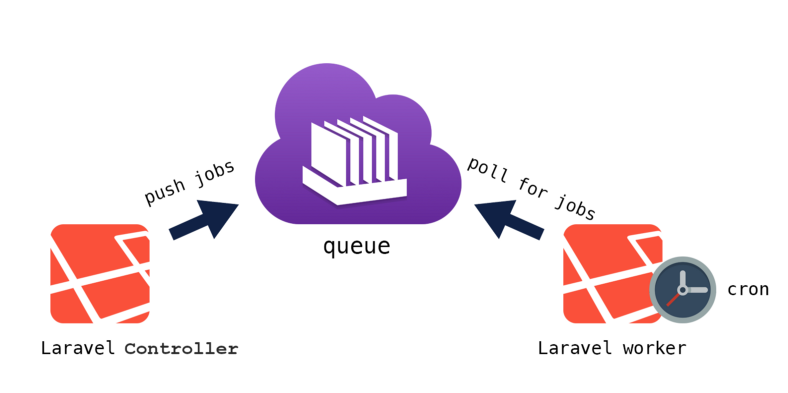
QUEUES
let’s create a job that can be dispatched to a queue. Run a following command
php artisan make:job SendOrderEmailLet’s pass in an Order instance to the constructor. Let’s also add some logging.
<?php

namespace App\Jobs;

use Illuminate\Bus\Queueable;
use Illuminate\Queue\SerializesModels;
use Illuminate\Queue\InteractsWithQueue;
use Illuminate\Contracts\Queue\ShouldQueue;
use Illuminate\Foundation\Bus\Dispatchable;

use Illuminate\Support\Facades\Mail;
use App\Mail\OrderShipped;
use App\Order;
use Log;

class SendOrderEmail implements ShouldQueue
{
use Dispatchable, InteractsWithQueue, Queueable, SerializesModels;

public $order;

/**
* Create a new job instance.
*
* @return void
*/
public function __construct(Order $order)
{
$this->order = $order;
}

/**
* Execute the job.
*
* @return void
*/
public function handle()
{
$recipient = 'steven@example.com';
Mail::to($recipient)->send(new OrderShipped($this->order));
Log::info('Emailed order ' . $this->order->id);
}
}
Rewrite our MailController to dispatch the SendOrderEmail job instead of sending the email directly.
<?php

namespace App\Http\Controllers;

use Illuminate\Http\Request;

use Illuminate\Support\Facades\Mail;
use App\Jobs\SendOrderEmail;
use App\Order;
use Log;

class MailController extends Controller
{
public function index() {

$order = Order::findOrFail( rand(1,50) );
SendOrderEmail::dispatch($order);

Log::info('Dispatched order ' . $order->id);
return 'Dispatched order ' . $order->id;
}
}
Re-run http://localhost:8000/mail, email sent successfully to mailtrap with queues with log some info.
[2018-03-28 22:22:18] local.INFO: Emailed order 20
[2018-03-28 22:22:18] local.INFO: Dispatched order 20
like so. check out Laravel’s documentation on queues.
We will go further in Database, Redis queues in following articles..
Thanks for reading.